In this tutorial, we’ll show you how to integrate WS Form PRO with the Pods plugin. You’ll learn how to create a form that can create a WordPress post that contains custom fields configured in Pods.
Pods is a plugin that allows you to create custom fields, post types and taxonomies. WS Form can be fully integrated with custom fields created using Pods.
By using WS Form you can develop powerful, mobile friendly forms that have any layout.
In this tutorial we’re going to create a form that will create a new blog post when it is submitted. These same instructions can be used to create any other post types such as pages or products.
When used with the WS Form Post Management Add-On you can:
- Automatically create forms that contain the fields you have made in Pods for any post type.
- Automatically populate select, checkbox, radio and button groups with the choices you have configured in Pods.
- Push form submissions as new posts that are fully compatible with Pods.
- Pre-populate forms using post data that includes Pods fields.
Pods group fields are fully supported when creating, populating and submitting forms.
Prerequisites
For this tutorial you will need the following plugins:
- Pods (And any associated extensions)
- WS Form PRO
- Post Management Add-On (Also compatible with the User Management Add-On)
Create Fields in Pods
First, we’re going to create some custom fields that will appear when we edit a post in WordPress. We can choose any of the field types that Pods offers, including groups and key value fields.

You can find some helpful resources on how to configure Pods here.
The following Pods field types are supported in WS Form:
Text
- Plain Text
- Website
- Phone
- Password
Paragraph
- Plain Paragraph Text
- WYSIWYG (Visual Editor)
- Code (Syntax Highlighting)
Date / Time
- Date / Time
- Date
- Time
Number
- Plain Number
- Currency
Relationships / Media
- File / Image / Video
- oEmbed
- Relationship
Other
- Yes / No
- Color Picker
Layout Elements
- Heading
- HTML Content
Create a Form
Next, we’re going to create a form in WS Form. To do this, we click on Add New in the WS Form menu.

Because we have the Post Management add-on installed, you’ll see that we have a Post Management tab. If we click on that tab it will show us templates for each post type registered in WordPress. We’re going to choose the Post template.

After you click on a template, WS Form automatically creates a form for you. WS Form will:
- Add basic post fields (title, excerpt and featured image).
- Add Pods fields, fully configured according to your Pods settings.
- Add taxonomy term selectors (e.g. Category and Tags on posts).
At the top of the form is a section that includes standard fields we would expect to see for a post, such as the title, content an excerpt. In addition to that it has created fields and sections for all of the custom fields we created with Pods.

You can edit the form in exactly the same way as you would any other form. For example, you can resize fields, resize sections and even split the form up across multiple tabs. All of the functionality of the WS Form layout editor is available to you.
Field Mapping (Optional)
When the form is submitted, the fields on your form are used to create a post in WordPress. WS Form automatically creates field mappings for you if you use a template.
The fields are mapped to either WordPress or Pods fields by using a Post Management action.
To edit the field mappings:
- Click the Actions icon at the top of the layout editor.
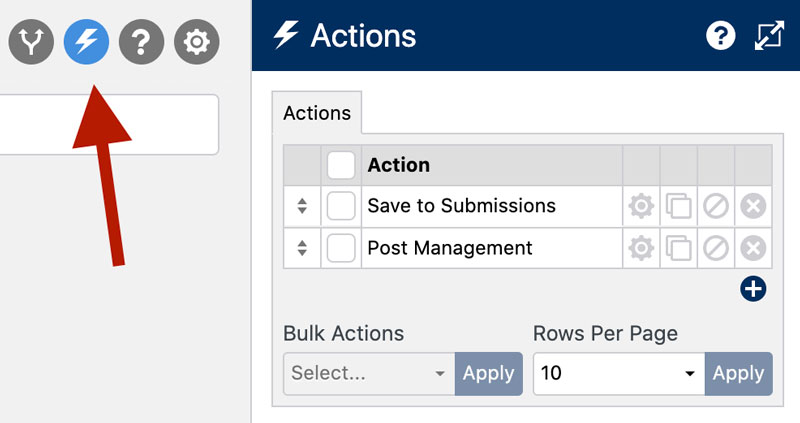
- Click the gear icon next to the Post Management action.
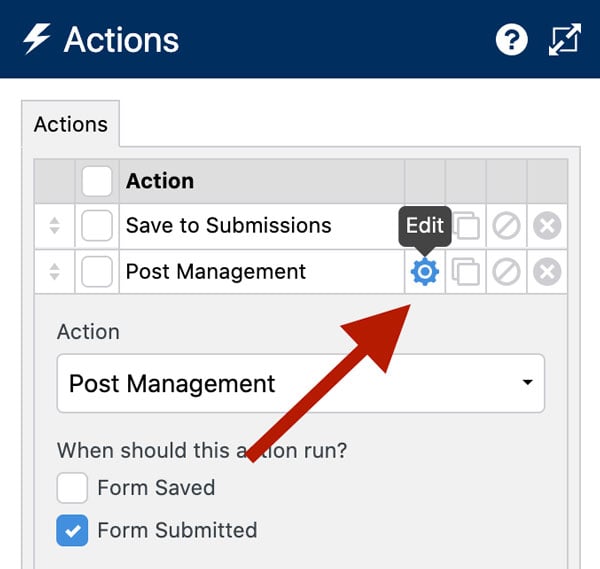
- Scroll down to the Field Mapping and Pods Field Mapping.

- Adjust the field mappings as required then click Save & Close. For more information about field mapping, see our Post Management knowledge base article.
Fields such as selects, checkboxes and radios pull their choices dynamically from Pods. This means that if you change a choice in Pods it will automatically update on your form.
Likewise, relational fields in Pods such as Post Object and User fields are also updated dynamically.
Preview The Form
Now let’s test the form. To do that we simply click the Preview button.

You’ll notice in our preview window that we have the WS Form debug console open. This is a really great feature for testing forms and allows you to populate a form in a single click. Every time you click Populate the form is populated with different data. There’s even a Populate & Submit button which lets you populate the form with data and submit it.
View The Post
Now that the form is submitted, let’s take a look at how that looks in WordPress.
First, we’ll click back to the WordPress admin. Then we’ll click on Posts in the WordPress menu.
And there is our new post that was created by WS Form.

If we click on the post, we can see that the post title, excerpt and content have been populated from the form. Below that you can see the custom fields created in Pods that have also been populated.
WS Form supports integration with all of the core Pods field types.
Pre-Populating a Form with Pods Custom Fields
In addition to creating posts, WS Form can also pre-populate forms using Pods custom fields. To demonstrate this, we’ll go back to the layout editor for the form we just created. Next, we click on the form settings icon at the top of the layout editor.
Then we click on the data tab. From here we configure WS Form to populate the form using the data from an existing WordPress post. In this example, we’ll set WS Form to use the ID of the post we just created.

Below that, you will find the field mappings.

These allow you specify which post and Pods fields will be mapped to which WS Form field. You’ll notice that because we created this form from a template, all of the fields are already mapped for us, so all we need to do is click Save & Close. Then we click Preview to view the form.
The form has been populated with the data from the post and is ready for editing.
And that’s how easy it is to integrate WS Form with Pods!