Groundhogg is a marketing automation and CRM plugin for WordPress.
This add-on lets you use any form created in WS Form to create and update Groundhogg contacts, as well trigger any funnel using our benchmark.

Installation
The Groundhogg plugin is installed in the same way as installing the WS Form PRO plugin.
Once installed you will need to activate the license for the plugin. When you purchase the Groundhogg plugin, you will be given a license key. If you have lost your license key(s), click here.
To activate your license key:
- Click WS Form in the WordPress administration menu.
- Click Settings.
- Click the Groundhogg tab at the top of the page.
- Enter your license key.
- Click the Activate button.
If your license key fails to activate, please ensure you are using the correct license key and not your WS Form PRO license key.
Creating a Form for Groundhogg
Automatically
The Groundhogg add-on comes with two form templates. These templates can be used to build forms that create new contacts in Groundhogg when submitted.
To create a Groundhogg form in WS Form:
- Click WS Form in the WordPress administration menu.
- Click Add New.
- Select the Groundhogg tab at the top of the page.
- Click on the basic or advanced form template.

That’s it! Your form will be created and is ready to add to your website. You can edit the form like any other form built with WS Form.
You can test the form by clicking Preview or by adding the form to one of your web pages.
When the form is submitted, it will create (or update) a contact in Groundhogg.
Using the WS Form PRO Benchmark
Groundhogg benchmarks listen for special website events that launch automated workflows in the funnel builder.
When this WS Form PRO creates a new contact in Groundhogg, it triggers the WS Form PRO benchmark.
To use the WS Form PRO benchmark:
- Create or edit a Groundhogg funnel.
- Click + Add Step.
- Click WS Form PRO

- Select which form you would like the step to run for. Leave this setting blank if you want this step to run for any form.
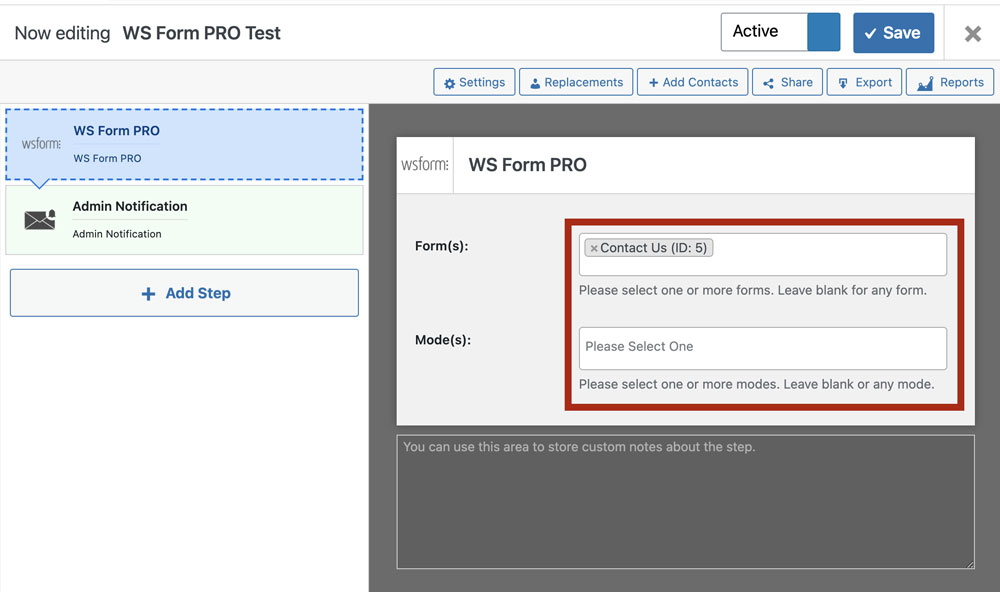
- Select which mode you would like the step to run for. Leave this setting blank if you want this step to run for any mode.
- Click Save.
Manually Configuring a Form
It is also possible to use any form created in WS Form and add an action so that a contact is created in Groundhogg when a user saves or submits their form.
To add a Groundhogg action:
- When editing your form, click the Actions icon at the top of the page. The Actions sidebar will open on the right-hand side of the page.
- Click the Add icon to add a new action.
- Select Add to Groundhogg from the Action pulldown. A series of settings will appear.
As with all sidebars in WS Form, click to the Save & Close button at the bottom to save your changes, or click Cancel to disregard your changes.
The Groundhogg action settings are as follows:
When Should This Action Run?
You can choose to run the Groundhogg action when the form is saved, submitted, or both.
Opt-In Field
Use this setting to select which of your fields to act as the opt-in field. We recommend adding a checkbox field with a single checkbox. It is always recommended that you have an unchecked opt-in checkbox on your forms to ensure you comply with GDPR requirements.
Opt-In Status
Each contact in Groundhogg has an opt-in status. The available statuses are as follows:
- Unconfirmed
- Confirmed
- Unsubscribed
- Subscribed Weekly
- Subscribed Monthly
- Bounced
- Spam
- Complained
Use this setting to determine which opt-in status is assigned to the contact.
Field Mapping
Field mapping tells WS Form which of your form fields relate to the corresponding fields in Groundhogg. For example you would want to map your Email field to the Email field in Groundhogg.
To map a field:
- Click the Add icon at the bottom right of the field mapping section.
- In the left column, select your form field.
- In the right column, select the corresponding Groundhogg field.
- Repeat this process for each field on your form.
- Click the Save button to save your changes.
Custom Mapping
Custom mapping allows you to set a Groundhogg field to any value you wish, including the use of WS Form variables. For example you might want to map a lead source such as the variable #form_label to the source field in the Lead object in Groundhogg.
To add a custom mapping:
- Click the Add icon at the bottom right of the field mapping section.
- In the left column, enter a value and/or a WS Form variable.
- In the right column, select the corresponding Groundhogg field.
- Repeat this process for each field on your form.
- Click the Save button to save your changes.
Owner
Use this setting to assign the contact to a particular WordPress user in Groundhogg. This setting is optional.
Tag(s)
When a new contact is created, Groundhogg will automatically assign the contact to one or more tags. This setting allows you to add additional tags to a contact. Search for an existing tag or enter a new tag into this field and then type Return to save the tag.
Notes
You can add one or more notes to a contact using this setting. To add a note:
- Click the Add icon at the bottom right of the notes section.
- Enter a note. You can type plain text and/or a WS Form variable.
- Repeat this process for each note you wish to add.
- Click the Save button at the bottom of the sidebar to save your changes.
Attachment Mapping
File and signature fields can be mapped so that they are uploaded as attachments to the post when it is added.
To add a file or signature field as an attachment:
- Click the Add icon at the bottom right of the attachment mapping section.
- Select your form field.
- Repeat this process for each field on your form that you want to include as an attachment.
- Click the Save button to save your changes.
File fields that are marked as multiple will result in multiple attachments if more than one file is uploaded.
Custom Meta
This setting is used to add custom meta to the contact.
To add a custom meta key-value pair:
- Click the Add icon to add a row.
- Enter the key in the left column.
- Enter the value in the right column.
- Click Save to save the custom attributes.
Populate Forms Using Groundhogg
As well as pushing form data with this add-on, you can also retrieve contact data and populate the fields on your form.
This feature is only available if a website visitor is signed in and their WordPress email address matches the email address of a contact in Groundhogg.
To enable this feature:
- Click the Form Settings icon in the top toolbar when editing a form.
- Click the Data tab in the sidebar.
- Enable the Populate Using Action setting.
- Choose Groundhogg from the Action To Populate From pull-down menu.
- Select the list you wish to populate data from in the List To Populate From pull-down menu. Contact is the only option here.
- Map the Groundhogg fields to your form fields.
- Click Save at the bottom.
Note that if you created your form using a Groundhogg template the field mappings will automatically be created for you.