The WordPress Filter Hook data source allows you to dynamically populate data grids with your own data for fields such as Select, Checkboxes and Radios. It can also be used to populate data lists for fields such a Text, Email and URL. This done by writing custom PHP code.

Examples of ways in which you could populate a data grid using this data source include:
- Querying a MySQL database
- Dynamically reading data from a CSV or XML file
- Complex WP_Query calls
The possibilities are endless!
What are WordPress Filter Hooks?
WordPress Filter Hooks give you the ability to change data during the execution of WordPress Core, plugins, and themes. Callback functions for Filter Hooks accept a variable, modify it, and return it. Filters Hooks expect to have something returned back to them.
Learn more about WordPress hooks
Adding the Data Source to a Field
To add a data source to a field:
- Click the settings icon of the field you want to use a data source with.
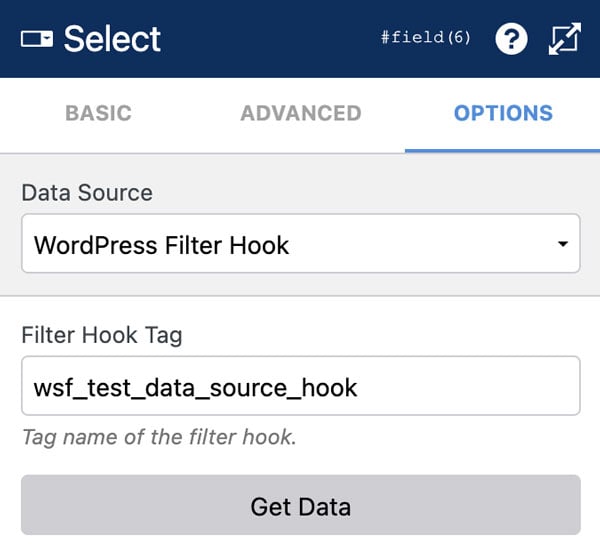
- Click on the right most tab in the sidebar (e.g. for a Select field this is called Options)
- Use the Data Source setting to select the WordPress Filter Hook data source.
- Enter the name of our filter hook.
Creating The Filter
First we are going to use the following function to create a new filter in WordPress:
add_filter( string $tag, callable $function_to_add, int $priority = 10, int $accepted_args = 1 )
You can learn more about this function by clicking here.
The tag we will use is a WS Form filter called:
wsf_test_data_source_hook
The second parameter provides WordPress with the callback function through which the form validation parameters will flow.
The third parameter determines the priority, we can just leave that with a number of 10.
The fourth parameter defines how many parameters are passed to the callback function. In the case of the WordPress Filter Hook, 3 parameters are passed.
The complete statement looks something like this:
add_filter( 'wsf_test_data_source_hook', 'wsf_test_data_source_hook_callback', 10, 3 );
You would typically add this code to your WordPress themes functions.php, and preferably in a child theme to avoid it getting deleted if you update your theme.
Creating The Callback Function
This callback function is called automatically by WS Form when the data grid is populated.
Three parameters are passed to the callback function:
$data_grid – This array contains the data grid itself. It defines the columns, groups and rows of data for the data grid.
$field_id – This is the field ID on your form that is being populated. You can use this to ensure the data grid you are populating relates to the appropriate field.
$form_object – This is the entire form object should you need to reference it.
Here is an example of the callback function:
// My callback function for tag wsf_test_data_source_hook
function wsf_test_data_source_hook_callback( $data_grid, $field_id, $form_object ) {

	// Check field ID
	if( $field_id !== 123 ) { return $data_grid; }

	// Build new data grid here
	// ...

	// Return the data grid back to the filter
	return $data_grid;
}
This example does the following:
- Checks that the field ID equals 123. You would replace this with the field ID you wish to populate.
- A new data grid array is built.
- The data grid is returned to the filter.
A Full Example
A full example showing the format of the $data_grid array is shown below:
// Add a filter for WordPress Filter Hook data source to use
add_filter( 'wsf_test_data_source_hook', 'wsf_test_data_source_hook_callback', 10, 3 );

// My callback function for tag wsf_test_data_source_hook
function wsf_test_data_source_hook_callback( $data_grid, $field_id, $form_object ) {

	// Check field ID
	if( $field_id !== 48136) { return $data_grid; }

	// Build new data grid

	// Define columns
	$data_grid[ 'columns' ] = array(

		// Column 1
		array( 'label' => __( 'Value' ) ),

		// Column 2
		array( 'label' => __( 'Label' ) )

		// Other columns ...
	);

	// Define first group
	$data_grid[ 'groups' ] = array(

		// Group 1
		array(

			// Label for first group
			'label' => __('My First Group'),

			// Setting mask_group to 'on' will do the following:
			// Select fields: Wraps the rows in an optgroup tag
			// Checkbox and Radio fields: Wraps the rows in a fieldset tag
			'mask_group' => '',

			// Define rows in first group
			'rows' => array(

				// Row 1
				array(

					// Set as default row
					'default' => true,

					// Set required (Checkbox fields only)
					'required' => false,

					// Set disabled
					'disabled' => false,

					// Set hidden
					'hidden' => false,

					// Column data
					'data' => array(

						// Column 1
						'value_1',

						// Column 2
						__( 'Label 1' )
					)
				),

				// Row 2
				array(

					// Column data
					'data' => array(

						// Column 1
						'value_2',

						// Column 2
						__( 'Label 2' )
					)
				),

				// Row 3
				array(

					// Column data
					'data' => array(

						// Column 1
						'value_3',

						// Column 2
						__( 'Label 3' )
					)
				)

				// Other rows ...
			)
		)

		// Other groups ...
	);

	return $data_grid;
}
You can use any PHP code you wish to populate the data grid.
Retrieving Your Data
To test your PHP script, click the Get Data button. If an error occurs, WS Form will show an alert in the layout editor. If the data is successfully retrieved it will be shown in a data grid. This allows you to proceed to column mapping.
The Get Data button is only required for retrieving data to test your PHP script output and/or column mapping. Data is automatically retrieved when the select field is shown on your website.
If your PHP code relies on the $post global variable, note that when the Get Data button is clicked, $post won’t be available. This is because the request is coming from a WordPress admin page rather than a page or post on your website. If your code relies on obtaining a post ID, then you should check if the $post global variable is available, and if not perhaps set the post ID to a test ID you can use for the purpose of testing your code.
// Test post ID for "Get Data" requests from the admin sidebar
$post_id_test = 123;

// Set post ID
$post_id = ( empty( $post->ID ) ? $post_id_test : $post->ID );
Column Mapping
If your returned data contains multiple columns of data, you can use column mapping to determine which columns are used for the value and labels of Select, Checkbox and Radio fields. The column mapping settings are shown underneath the data grid.

There are three column mappings to consider:
- Labels Choose which column is used as the label shown to the user on the form.
- Values Choose which column is used as the value stored when a choice is made by the user.
- Action Variables Choose which column is used for displaying a users choice in email notifications and other integrations or actions.
By default, WS Form will use the first column for each of these settings.
Each time you retrieve new data you should ensure the column mappings are correct.