
When exporting submissions to CSV, WS Form enables you to choose which columns are included and arrange them in the order you need.
Your column selection and order are saved for each form and WordPress user, so they are automatically restored the next time you export submissions from that form.
Export Submissions To CSV
To export submissions:
- Go to WS Form → Submissions.
- Choose one of the following export methods:
- Click Export CSV at the top of the submissions page to export submissions matching your current filters.
- Click Export on an individual submission row to export that submission.
- Select submissions, choose Export CSV from Bulk Actions, and apply the bulk action to export the selected submissions.
- Choose the columns you want to include in the Export CSV modal.
- Arrange the selected columns in the order you want them to appear in the CSV.
- Click Export CSV.
Choosing Columns
The Export CSV modal enables you to choose which columns to include in the CSV export.
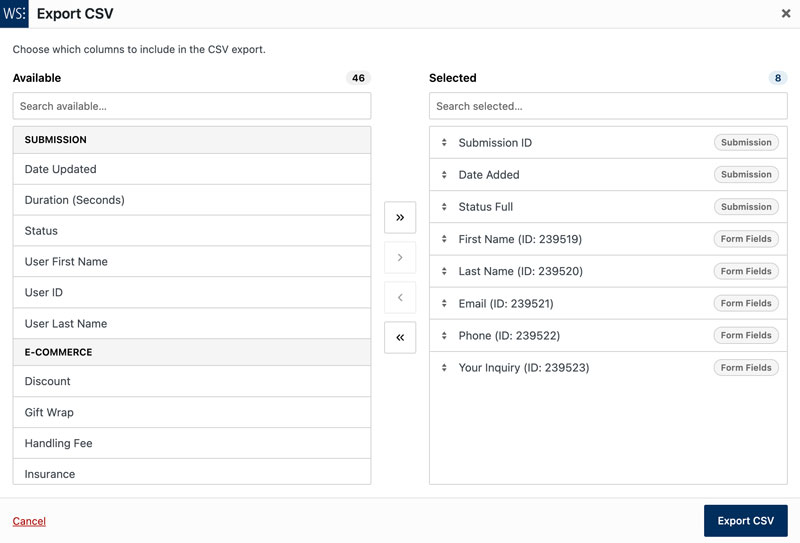
Columns are divided between two lists:
- Available – Columns that are not currently included in the export.
- Selected – Columns that will be included in the export, shown in their export order.
To add or remove columns, click one or more items to highlight them, then use the arrow buttons between the lists. You can also use the add all and remove all buttons to move all columns at once.
Double-click a column to quickly move it between Available and Selected.
At least one column must be selected. If the Selected list is empty, an inline message is shown and the export will not begin.
Reordering Columns
The order of columns in the Selected list determines their order in the downloaded CSV.
Drag columns up or down using the drag handle to change their order. This can be useful when preparing CSV files for reporting or importing into another application that expects columns in a particular order.
Selected columns also show a category label, such as Submission or Form Fields, to help identify where each column originates.
Searching For Columns
Use Search available… or Search selected… to quickly find columns. This is particularly useful for forms with a large number of fields.
A count is shown for each list so you can see how many columns are available and selected.
Column Groups
Columns in the Available list are organized into groups to make them easier to find. Depending on the form and your WS Form edition, these can include:
- Submission – Submission information such as the submission ID, date, and status.
- Form Fields – Fields included on the form.
- E-Commerce – E-commerce submission data available with WS Form PRO.
- Tracking – Tracking information available with WS Form PRO.
- Custom – Additional columns added through filters or other customizations.
Form field columns show the field label followed by the Field ID, for example Email (ID: 123). This makes it easier to distinguish between fields with similar labels.
Click a group heading to select all columns in that group. Double-click a group heading to move the entire group between Available and Selected.
The Selected list is displayed as a flat list, allowing columns from different groups to be arranged in any order.
Export Filters
Choosing CSV columns does not change which submissions are exported. The export continues to respect the submissions currently being viewed or selected.
This includes filters such as date range, keyword searches, submission status such as spam or trash, and selected submission IDs when using a bulk export.
Column selection controls the information included for each exported submission, while your submission filters control which submissions are included.
Saving Column Preferences
When you click Export CSV, your selected columns and their order are saved automatically.
Preferences are saved separately for each WordPress user and each form. This allows different users to maintain their own export configuration, while also allowing different column configurations for different forms.
If fields or other columns are added later, they become available in the Available list. Your existing saved selection and column order are retained, and the new columns can be added when needed.
Downloading The CSV
When you are ready to export, click Export CSV. The CSV contains the selected columns in the order shown in the Selected list.
For larger exports, WS Form builds the CSV in steps and displays a progress indicator while the export is being prepared. The CSV is downloaded when the export is complete.
Click Cancel to close the modal without exporting.
Developer Notes
The wsf_submit_export_csv_header and wsf_submit_export_csv_row filter hooks receive the full CSV header and row data.
Column selection is applied after these hooks have run. Custom columns added through filters can therefore be made available for selection alongside standard WS Form columns.