Tip: We recommend using the templates in the Post Management category on the Add New page to create your forms. WS Form will automatically add the form fields as well as creating mappings for populating and updating the post data.
Updating a WordPress post using a form is achieved in WS Form using the Post Management integration. Posts in WordPress represent blog posts, pages or any other custom post you have configured in WordPress.
There are two steps involved when updating a post using WS Form.

- Populate the form with the original post data.
- Update the post when the form is submitted.
Choose Which Post to Update
There are three methods you can use to determine which post to update. An explanation of each method and how to configure your form is described below.
Current Post
Use this method if you want to update the post that the form is placed on.
1. Populate the Form
 To populate the form with post data you use the Data tab in the Form Settings sidebar. To do this:
- Click the form settings icon in the top toolbar.
- Click on the Data tab.
- Check the Populate Using Action setting.
- Choose Post Management from the Action To Populate From dropdown.
- Choose the the post type you would like to populate data from.
- Enter
#post_id(or leave it blank) to use the Post ID of the post/page the form is shown on. - Use the field mapping, meta mapping and tag mapping settings to determine which fields, meta and tag (WordPress terms) you would like to populate into which fields of your form. Click the Add icon to add new mappings.
- Click Save.
2. Update the Post
 Updating the post when the form is submitted is done via the Post Management action. To do this:
- When editing your form, click the Actions icon at the top of the page. The Actions sidebar will open.
- If you do not yet have a Post Management action:
- Click the Add icon to add a new action.
- Choose Post Management from the Action pulldown.
- Choose the post type you would like to update.
- Enter
#post_idin the Post ID setting. - Under Status we recommend choosing the Default setting to retain the existing post status. Otherwise you can choose a specific status for the post.
- Use the field mapping and other mapping settings to determine which fields you would like to populate into which fields of your form. Click the Add icon to add new mappings.
- Click Save.
Query String Parameter
Use this method if you want to specify the post ID to update in a query string parameter.
For example, the URL to your page might be:
https://yourwebsite.com/page-with-form/?post_id=123
Note that the post ID is specified using the query string at the end of the URL.
post_id=123
So, in this example the post ID to update would be 123 using the query parameter post_id.
1. Populate the Form
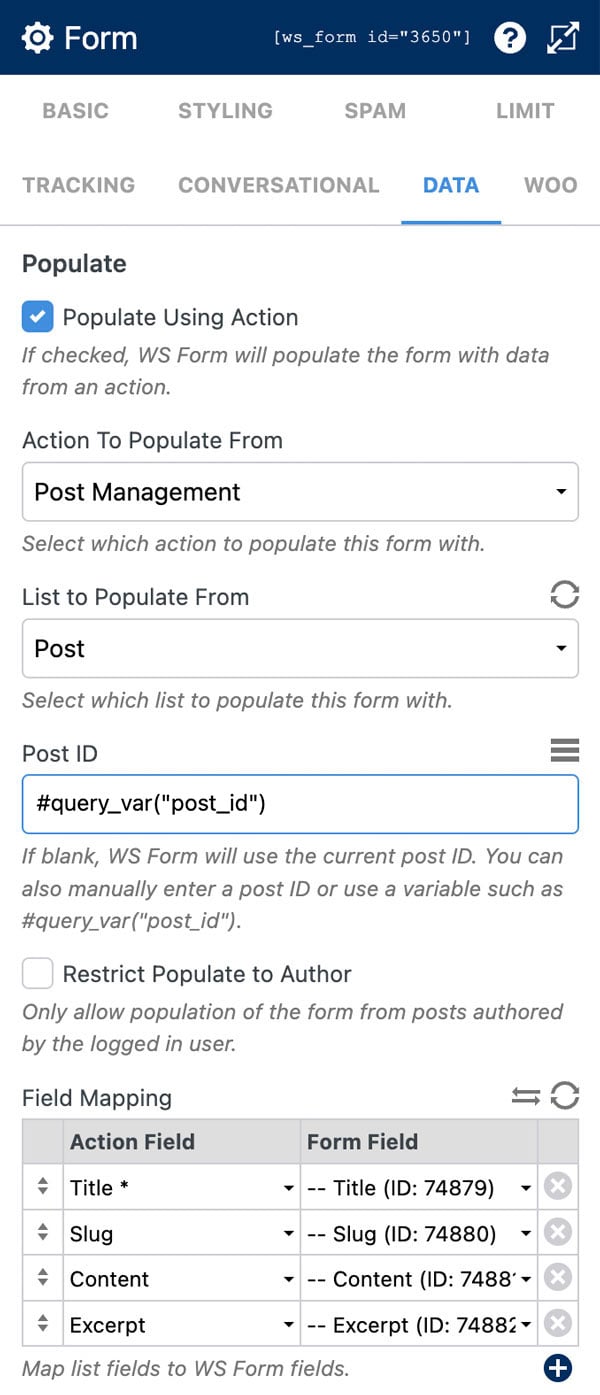 To populate the form with post data you use the Data tab in the Form Settings sidebar. To do this:
- Click the form settings icon in the top toolbar.
- Click on the Data tab.
- Check the Populate Using Action setting.
- Choose Post Management from the Action To Populate From dropdown.
- Choose the post type of the post you are populating from.
- Enter
#query_var("post_id")in the Post ID setting. - Use the field mapping, meta mapping and tag mapping settings to determine which fields, meta and tag (WordPress terms) you would like to populate into which fields of your form. Click the Add icon to add new mappings.
- Click Save.
2. Update the Post
Updating the post when the form is submitted is done via the Post Management action.
To do this:
 Add a Hidden Field
A hidden field is required to pass the post ID through to WS Form when the form is submitted.
- Add a hidden field to your form.
- Set the Default Value field setting to
#query_var("post_id").
 Configure the Post Management action
- When editing your form, click the Actions icon at the top of the page. The Actions sidebar will open.
- If you do not yet have a Post Management action:
- Click the Add icon to add a new action.
- Choose Post Management from the Action pulldown.
- Choose the post type you would like to update.
- Enter
#field(123)in the Post ID setting. Change 123 to the ID of the hidden field you added. - Under Status we recommend choosing the Default setting to retain the existing post status. Otherwise you can choose a specific status for the post.
- Use the field mapping and other mapping settings to determine which fields you would like to populate into which fields of your form. Click the Add icon to add new mappings.
- Click Save.
Specific Post ID
Use this method if you want to update a specific post instead of specifying the post ID dynamically.
1. Populate the Form
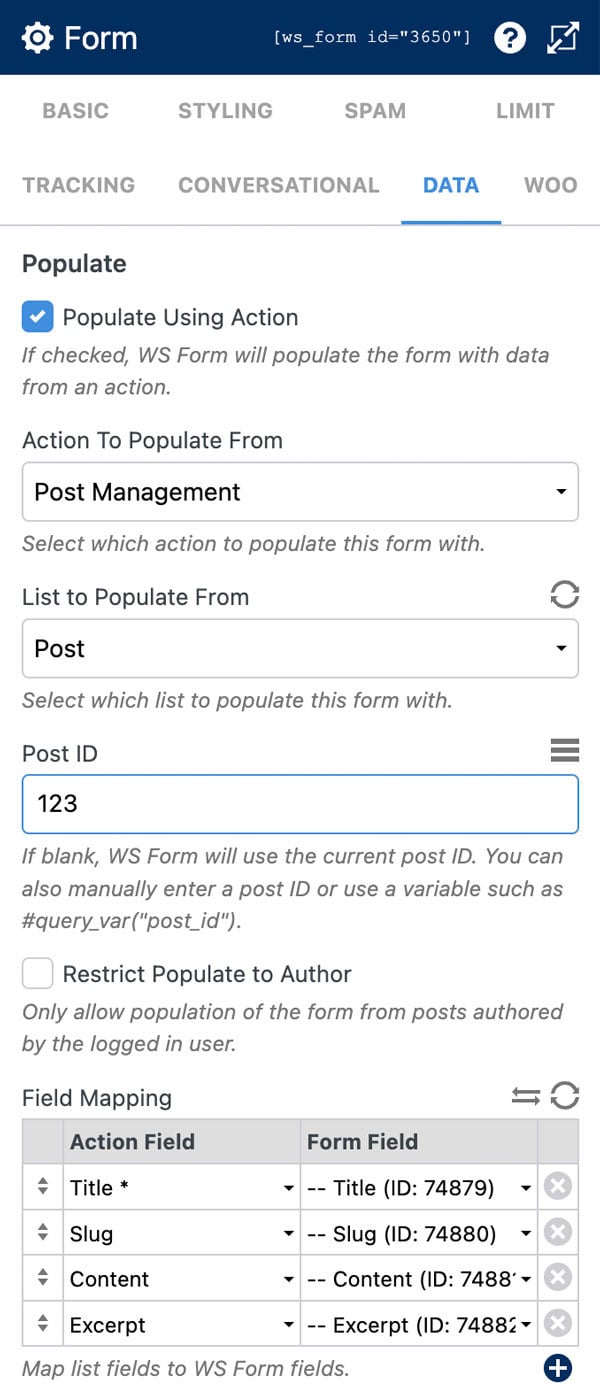 To populate the form with post data you use the Data tab in the Form Settings sidebar. To do this:
- Click the form settings icon in the top toolbar.
- Click on the Data tab.
- Check the Populate Using Action setting.
- Select Post Management from the Action To Populate From dropdown.
- Select the the post type you would like to populate data from.
- Enter a post ID (e.g. 123) in the Post ID setting.
- Use the field mapping, meta mapping and tag mapping settings to determine which fields, meta and tag (WordPress terms) you would like to populate into which fields of your form. Click the Add icon to add new mappings.
- Click Save.
2. Update the Post
 Updating the post when the form is submitted is done via the Post Management action. To do this:
- When editing your form, click the Actions icon at the top of the page. The Actions sidebar will open.
- If you do not yet have a Post Management action:
- Click the Add icon to add a new action.
- Select Post Management from the Action pulldown.
- Select the the post type you would like to update.
- Enter a post ID (e.g. 123) in the Post ID setting.
- Under Status we recommend choosing the Default setting to retain the existing post status. Otherwise you can choose a specific status for the post.
- Use the field mapping and other mapping settings to determine which fields you would like to populate into which fields of your form. Click the Add icon to add new mappings.
- Click Save.
Troubleshooting
Form Won’t Populate
- If your form has been saved, it could be overwriting the populated post data. Clear the session ID. Learn more
- Ensure you have specified the correct Post ID to populate from. Learn more
- Ensure all fields are mapped correctly. Learn more
Post Won’t Update
- If you are using a query string parameter to specify the post ID, ensure you are passing that value through by using a hidden field. Learn more
- Ensure you have specified the correct Post ID to update. Learn more
- Ensure you have configured the Actions > Post Management settings to use the correct post ID. See above.
- Ensure all fields are mapped correctly. Learn more