This add-on lets you subscribe and unsubscribe Brevo contacts using a WordPress form created in WS Form. You can create new forms from your Brevo lists in a single click from the add form page. You can also pre-populate forms with data from Brevo.
Brevo was formerly Sendinblue.
Installation
The Brevo plugin is installed in the same way as installing the WS Form PRO plugin.
Once installed you will need to activate the license for the plugin. When you purchase the Brevo plugin, you will be given a license key. If you have lost your license key(s), click here.
To activate your license key:
- Click WS Form in the WordPress administration menu.
- Click Settings.
- Click the Brevo tab at the top of the page.
- Enter your license key.
- Click the Activate button.
If your license key fails to activate, please ensure you are using the correct license key and not your WS Form PRO license key.
Connecting to Brevo
In order to use the add-on, you need to connect it to Brevo. Connecting is easy!
- Click WS Form in the WordPress administration menu.
- Click Settings.
- Click the Brevo tab at the top of the page.
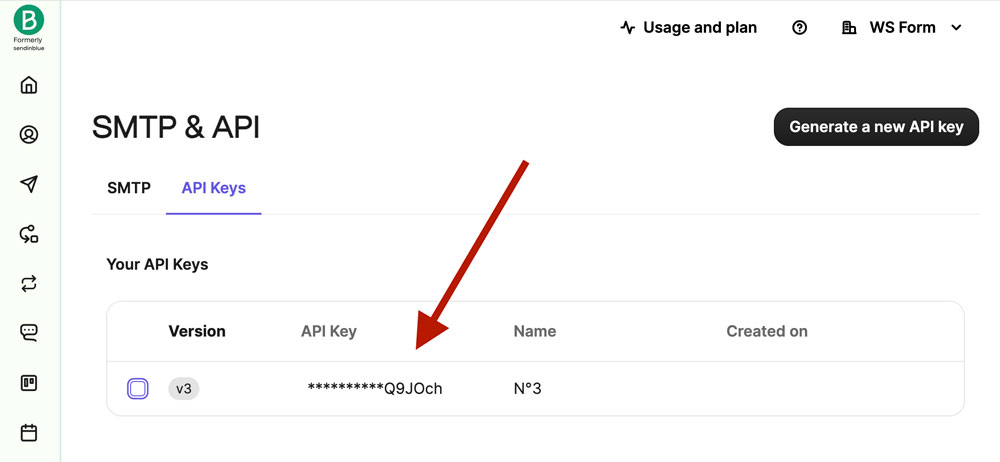
- Enter your API key from the Brevo SMTP and API page. Ensure you are using a version 3 key.
- Click Save.
If you do not have a Brevo account, you can create a new account here.
Creating a Form for Brevo
Automatically
WS Form can create a form for any of your Brevo objects in a single click. This process not only creates a form but also fully configures WS Form so that the form is ready to use immediately.
To create a Brevo form in WS Form:
- Click WS Form in the WordPress administration menu.
- Click Add New.
- Select the Brevo tab at the top of the page.
- Click on a list.
- Wait a few moments while the form is created.
That’s it! Your form will be created and is ready to add to your website.
If your list does not appear, click the refresh icon in the Brevo tab.
Manually
It is also possible to use any form created in WS Form and add an action so that it is submitted to a Brevo object when a user saves or submits their form.
To add a Brevo action:
- When editing your form, click the Actions icon at the top of the page. The Actions sidebar will open on the right-hand side of the page.
- Click the Add icon to add a new action.
- Select Add to Brevo from the Action pulldown. A series of settings will appear.
As with all sidebars in WS Form, click to the Save button at the bottom to save your changes, or click Cancel to disregard your changes.
The Brevo action settings are as follows:
When Should This Action Run?
You can choose to run the Brevo action when the form is saved, submitted, or both.
Brevo List
Select which list the contact should be subscribed to.
Status
You can choose to subscribe or unsubscribe a contact. For GDPR compliance you can also choose the Subscribe with Double Opt-In status. This method requires you to set-up a double opt-in template in Brevo.
If you are subscribing a contact, the email address or SMS attribute must be mapped and completed.
If you are unsubscribing a contact, the email address must be mapped and completed.
Enable Update (Subscribe Status Only)
If checked, the contact will be updated if a matching contact is already found.
Double Opt-In Template ID (Subscribe with Double Opt-In Status Only)
If you have chosen the Subscribe with Double Opt-In status, you will need to specify the template ID of a double opt-in template.
The template ID is a number. For example, in the screenshot below, the template ID would be: 1

How to Create a Double Opt-In Email Template in Brevo
To learn how to create a double opt-in email template please refer to the Brevo article:
- The optional step in this article of adding an
optintag to your email template is mandatory. You must add anoptintag to the email in order for Brevo to be able to identify it as a double opt-in template.
- You can ignore the last step in this article, (“Link your custom double opt-in confirmation template to your sign-up form”) as the double opt-in email will be triggered via their API from WS Form.
Double Opt-In Redirect URL (Subscribe with Double Opt-In Status Only)
If you have chosen the Subscribe with Double Opt-In status, you will need to specify the redirect URL that a user will be sent to after they have clicked the double opt-in link. This would typically be an absolute URL to a page on your website.
For example: https://mywebsite.com/double-opt-in-thank-you/
Opt-In Field
Use this setting to select which of your fields to act as the opt-in field. We recommend adding a checkbox field with a single checkbox. It is always recommended that you have an unchecked opt-in checkbox on your forms to ensure you comply with GDPR requirements.
When the users opts-in, WS Form will set the custom attribute OPT_IN to True.
Field Mapping
Field mapping tells WS Form which of your form fields relates to the corresponding attributes in Brevo. For example you would want to map your email form field to the email attribute in Brevo. WS Form supports mapping to normal, category and transactional attributes.
To map a field:
- Click the Add icon at the bottom right of the field mapping section.
- In the left-hand column, select your form field.
- In the right-hand column, select the corresponding Brevo attribute.
- Repeat this process for each field on your form.
- Click the Save button at the bottom of the sidebar to save your changes.
Custom Mapping
Custom mapping allows you to set a Brevo field to any value you wish, including the use of WS Form variables. For example you might want to map a lead source to a source attribute in Brevo, or perhaps set a transaction attribute ID to the #submit_id variable.
To add a custom mapping:
- Click the Add icon at the bottom right of the field mapping section.
- In the left-hand column, enter a value or a WS Form variable.
- In the right-hand column, select the corresponding Brevo attribute.
- Repeat this process for each field on your form.
- Click the Save button at the bottom of the sidebar to save your changes.
Populate Forms Using Brevo
As well as pushing form data with this add-on, you can also retrieve contact data and populate the fields on your form.
This feature is only available if a website visitor is signed in and their WordPress email address matches the email address of a contact in Brevo.
To enable this feature:
- Click the Form Settings icon in the top toolbar when editing a form.
- Click the Data tab in the sidebar.
- Enable the Populate Using Action setting.
- Choose Brevo from the Action To Populate From pull-down menu.
- Select the list you wish to populate data from in the List To Populate From pull-down menu.
- Map the Brevo attribute to your form fields.
- Click Save at the bottom.
Note that if you created your form using a Brevo template the field mappings will automatically be created for you.